
Our downstairs bathroom is finally getting a little attention. This is what it has looked like for the past year. No personality and all white. Pretty boring, right? Well not anymore! Jamie breathed some life into it by painting the room Cliffside Gray by Benjamin Moore.
  It’s actually the same color we have in our master bedroom. Don’t you love how something as simple as paint can improve a room?!
But the biggest improvement has to be the new cabinet doors he made!
Above the toilet we have a built-in cabinet.
 It’s great for storage, but looks kinda blah. Plus, the doors slide open and it’s hard to get anything out that’s in the middle of the shelf. Also, notice where the toilet paper holder is. Not very convenient. Any new guest in our home would always comment they had the hardest time finding it! Haha! Don’t worry, Jamie fixed that too.
If you follow me on Instagram, you would’ve seen that we picked up some supplies a few weeks ago. This project is what we were up to. We picked up some 1×2 pine boards as well as some beadboard. Jamie decided to take the existing doors, make them hinged, and reface the fronts.
He started by removing the doors from their track and removing the handles. He then used the backs of the doors to be the new front. He cut the 1×2 boards and glued and screwed them on to get this pattern. Jamie also spackled the seams. He then decided to cut the beadboard to fit inside each individual triangle, making sure to keep the pattern lined up. He attached them using glue. You could put the beadboard down first, but to make it flush, you would have to use a tongue and groove type process.
Once all of the pieces were in place, Jamie primed it and then gave it a few coats of white paint. He then added the hinges — 3 on each side.
Hanging them ended up proving to be more difficult than we thought. It was definitely a 2-person job between holding the doors up, lining it up properly, and screwing everything into place. It took some trial and error, but we eventually got it.
I think they turned out great, don’t you?! It’s hard to believe these are the same doors!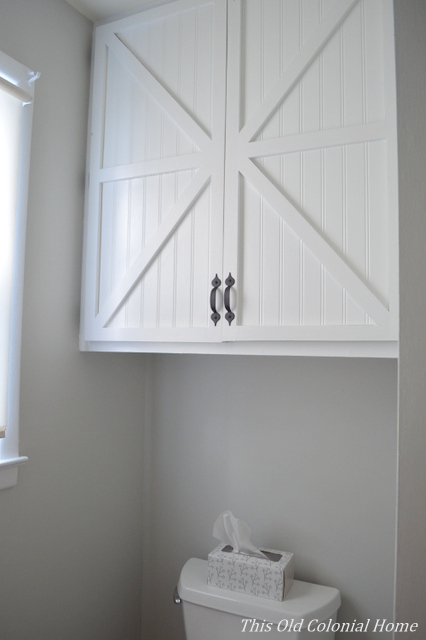
 And here’s the highly anticipated new locale for the toilet paper holder. Much more logical!
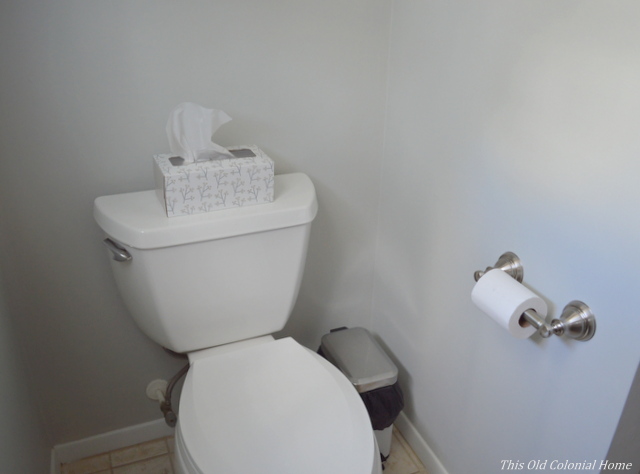 We also added these cool towel hooks that I picked up at Hobby Lobby.
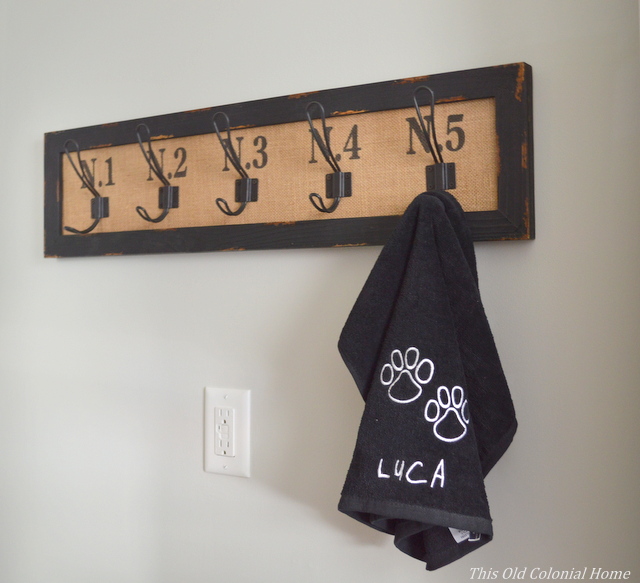 Of course there’s more we want to do in here eventually — like replace the vanity, mirror, and lighting. But for now, this is a pretty good start!
Linking up with Bless’er House | The Shabby Nest | Serenity Now

September 2, 2014 at 3:22 pm
wow what an improvement your hubs did a wonderful job with that door and moving thee tp holder is a blessing ha ha…new paint looks fab too great job xx
LikeLike
September 2, 2014 at 9:44 pm
Haha! The littlest things can have the biggest impact – like tp 😛 Thank you!
LikeLike
September 2, 2014 at 9:00 pm
It all looks amazing – J is wonderful with woodwork! I’d hire the two of you to help remodel our house any day! I look forward to seeing more! 🙂
LikeLike
September 2, 2014 at 9:45 pm
Thanks, Renee! Jamie continues to impress me with his woodworking skills!
LikeLike
September 7, 2014 at 2:19 pm
Love this! Beautiful. I would just paint the vanity and see if you could put some of the striped wood on the door and sides. It would all tie together. Add some hardware that matches your tp holder. 🙂
LikeLiked by 1 person
September 11, 2014 at 9:32 pm
Those barn door cabinets are beautiful! Love the towel hooks too! It’s looking so good.
LikeLike
September 11, 2014 at 9:47 pm
Thanks so much! I actually just joined your linkup party!
LikeLike
September 12, 2014 at 9:41 pm
This is so awesome! I love the transformation; keep up the great work!!
LikeLiked by 1 person