This Old Colonial Home

Filling our house with love and a lot of DIY


8 Comments

Baby Shower Decor

I recently hosted a baby shower for my good friend who’s expecting a girl later this summer. Because I love my friend and am so happy for her … and because, let’s be honest, I just can’t help myself … I crafted/created a few little things in hopes of making her shower extra special.

First, guests were welcomed to my friend’s home right away with a festive porch.Pink and white flower balloonsI can’t take credit for this. The flower balloons were a Pinterest find and the mama-to-be’s sister-in-law put them together. Aren’t they cute?!

Guests were further greeted by the front door with this little display.baby shower porch decorbaby shower umbrella decorGet it?! ‘Cause it’s a baby shower! 😛 (And it actually did rain that day.) But seriously, how cute are these little rain boots with baby’s breath?!baby shower rain boots decorOnce inside the entryway, there was a welcome chalkboard sign, framed sonogram picture, and favors. (I’ll get to those later!)baby shower chalkboard signThere wasn’t a theme for the shower, but we did go with a pink, gray, and white color scheme. I kept envisioning a garden party style and even though the weather didn’t allow us to be outside, I was still able to incorporate that idea and the colors inside!garden party baby shower
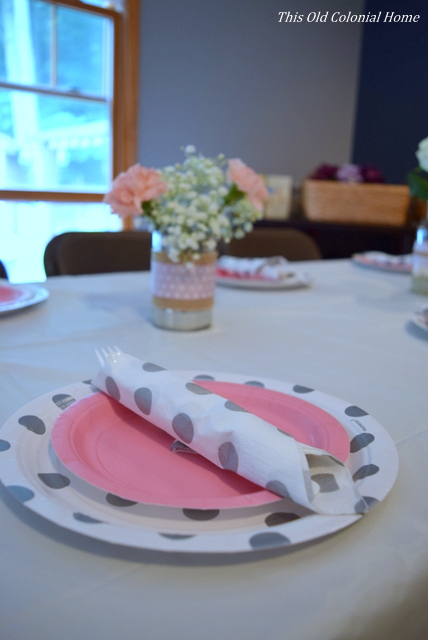
I love the look of a long table with place settings. Even though these are paper plates, they still add to the decor!baby shower table settingpink gray polka dot baby shower plates I crafted all of the centerpieces using mason jars and aluminum cans and wrapped them with a few different types of ribbon that I got from Michaels. I filled them with fresh flowers – hydrangeas, carnations, and baby’s breath.pink gray polka dots tablebaby shower mason jar centerpiecesDid you notice my DIY banner in the background? Here’s a closer look.baby shower banner diybaby doily bannerI made it using doilies, craft paper, twine, and clothes pins. I also made a little circle banner, which you can kind of see below hanging in the doorway. I’m such a sucker for banners!!baby-shower-tableWould anyone like a drink?mason jar beverage dispenserI put together this little beverage area using my recently painted drawer. (See it here.) Guests could easily grab a cup, napkin, and straw and fill up with some pink lemonade. There was also punch, but I didn’t manage to get a shot of that or the food. But don’t worry, I did get a picture of the dessert table. 😉 (Priorities, right?!)baby girl block cakedessert tableThe cake, which we ordered from a local bakery, turned out so adorable! We had way more sweets than we needed, but after all, little girls are made of sugar and spice and everything nice! (P.S. I also made the tiered platter using 2 plates, a candlestick, and some gorilla glue.)

And speaking of sugar …hershey bar favorsbaby-shower-hershey-favorsThese are the favors I made for the guests. I colored in the ‘she’ in Hershey’s using a pink sharpie, and then added the ribbon and little tag. (I like puns!)

I’m so glad I was able to do this for my friend so her family and friends could shower her with so much love. We can’t wait to meet the little one!


4 Comments

Christmas Crafts

As if this time of year isn’t busy enough with all the decorating, shopping, wrapping, baking … I decided to throw a few Christmas crafts into the mix as well. I just can’t help myself!

It kind of all started when I saw this cute sign at Marshalls.Rustic Christmas sign found at MarshallsI love its rustic vibe, but I didn’t love its $25 price tag. So I figured maybe I can make something similar.

I ended up using this framed mirror that I had lying around.Three pane mirror with hooks I didn’t want to keep the hooks, so I took them off and filled the holes with spackle. Wood filler would also do the job.Hook holes filled with spackle While I waited for that to dry, I covered the mirror in a brown paper bag and then some burlap. Once the spackle was set, I lightly sanded the entire frame. Then it was time to spray paint!Rustoleum spray painted red frame It only took 2 or 3 quick coats. After it was dry, I reinserted the now burlap backing.Red frame with burlap backing Then I simply used a snowflake stencil that I picked up at Party City for 99 cents. I used white paint I already had on hand and bought a foam pouncer from Michaels for around $2.50. Now granted my sign is a lot smaller than the one at Marshalls, but for less than $5 I’m pretty happy with it!

Eventually I would like to add some wording along the bottom, like ‘Let it Snow,’ but for now it still brings some holiday cheer to our living room.DIY snowflake signSnowflake sign and Christmas decor in living room In addition to the sign, I also made some fun, Origami stars using festive scrapbook paper.DIY Origami Christmas starsOrigami star made with scrapbook paper I’ve only done Origami a few times and the last time was probably when I was in 6th grade! But this video tutorial I found through Pinterest was really easy to follow! If I can do it, so can you!

And last, but not least — I couldn’t resist making some more no sew throw pillows! I followed the same method as my placemat pillows, but this time I used kitchen towels. The red one was actually plain, but I stenciled on a big snowflake!DIY no sew pillows with kitchen towels No sew Christmas throw pillowsIt’s another easy and inexpensive way to add some more Christmas cheer around the house!

If you want to keep up with more of my Christmas decor, please be sure to follow me on Instagram at @oldcolonialhome and check out the hashtag #oldcolonialhomechristmas 🙂

Merry Christmas, my friends!


4 Comments

No Sew Placemat Pillow

When it comes to sewing, my skills are pretty limited. I can reattach buttons and … nope, that’s it. I hope to change this one day and actually learn how to use a sewing machine. But until that day comes I’ll be using no sew methods that I come across. Exhibit A:No sew placemat pillow You guys, I actually made this little pillow! (Patting myself on the back.) Can you believe these are actually placemats from the dollar store? This was such an easy and inexpensive project.

Let me start at the beginning.

I had originally bought this placemat at our local dollar store thinking it would look cute in a frame for Thanksgiving.Thanksgiving placemat with turkey and pie Then I came across this lovely pillow that Collette over at Through the Front Door had made from a kitchen towel. Light bulb! I figured I could do something similar using the placemat and without using a needle and thread (because like I said I’m not that talented … yet). I just needed to pick up another mat for the back. But, of course, by the time I got around to it there weren’t any left. So I just picked up two new placements that were autumn-y.Thanksgiving cornucopia placemat Thanksgiving pumpkins placematI chose to use two different ones that way the pillow can be displayed on either side. (In reality it was because I couldn’t decide which one I liked better. Haha!)

The only other supplies I needed were stitch witchery and pillow filler, which I picked up at Michaels.

To make the pillow, I started by laying the placemat face down and cutting strips of the stitch witchery for along the edges.Line stitch witchery around edges of placematI then lined up the other placemat laying it face up.Lining up fabricTo get the tape to adhere to the placemats you cover the fabric with a damp press cloth and use a steam iron on the wool setting and press for about 10 seconds on each side. I didn’t have a press cloth so I just used an old kitchen towel, which worked fine.Use damp cloth when pressing stitch witcheryI went around three sides and let it cool before adding the pillow filler. Once my filler was in place, I tried ironing the last seam, but had a little difficulty getting it to stick. So I pinned it down just above the stitch witchery to help keep it in place.Hold fabric in place with straight pin That definitely worked better. And after just a few more presses, my pillow was complete!Easy no sew pillow using a placematReversible no sew pillow DIY no sew placemat pillowI probably could have stuffed it a little more, but hey, not bad for my first try I’d say. I have a lot left over, so I’ll definitely be making more of these. Maybe as Christmas gifts? Hmm.

As for the original placemat … I ended up making it into a banner for our mantel.DIY Thanksgiving banner for mantel All I did was cut out the squares and attach it to twine with some clothes pins – items I already had on hand. Easy peasy!

What do you think? What no sew items have you made?


Linking up with Home Remedies | DIY on the Cheap | Bless’er House


2 Comments

DIY Pumpkin Sign

Somehow I got it in my head that I wanted to make a wooden sign for fall. I’ve never made a sign before. But isn’t that kinda what DIY is all about? Winging it? Learning as you go?

I envisioned a rustic, vertical ‘PUMPKINS’ sign — thinking it could be a fun element to add to our decor.  Luckily Jamie is usually on board with the ideas I dream up because more often than not I end up needing his help. His only request was that I didn’t put the finished sign on our front steps. (“People will think we’re selling pumpkins.”) Haha, I suppose that’s possible!

We started by taking two scrap pieces of board and lining them up vertically leaving a slight space between them.Scrap pieces of wood for DIY signWe then screwed the backs of the boards to another scrap piece at the top and bottom.Boards screwed together using scrap piece of wood Back of boards screwed togetherBefore staining the wood, I did a little sanding to get some markings off. Then I decided to try Minwax Weathered Oak for, you guessed it, that weathered look.Weathered oak stain by MinwaxThe first coat came out pretty light even after leaving it on for 15 minutes. I did a second coat, again leaving it on for 15 minutes, which helped. A third coat probably would’ve been just the ticket. Oh well. Weather oak stain applied to woodAs for the letters, I decided to save some cash by printing my own. In Microsoft Word I picked the font Franklin Gothic at size 630. You’ll want to measure how big to make your letters. My boards were about 52″ long and I had 8 letters, so I figured around 6″ per letter, allowing room for spacing. (Yay guesstimated math!) I printed each letter on cardstock paper. To save on ink, just print the outline of the letters.Letters printed for DIY sign After I cut out each letter, I used two-sided tape to attach them to the boards.Cut out letters laid out on woodThis turned out to not be the best idea because the tape stuck to the wood more than the paper. After I traced the letters there was a lot of prying up with my fingernails.

For painting the letters I used Pure Pumpkin craft paint (that’s the actual color name) from Michael’s and used a small art brush to apply it.Pure pumpkin craft paint from Michael's I probably could’ve used a slightly bigger brush, but I worked with what I had. And then I realized — while trying to stay in the lines and getting visible brush strokes — I probably should’ve cut the letters as a stencil instead. (Shoulda, coulda, woulda. Learning as I go!)Pumpkin letters painted in orangeOnce the letters were dry, I did a little light hand sanding using 220-grit sandpaper to dull the orange.

And here it is on display in our dining room (and safe from pumpkin-buying passersby).Weathered oak and orange pumpkin signRustic wooded sign for fallDIY wood pumpkin sign fall decor Wood sign with orange pumpkin letters So all in all this project didn’t go quite as smoothly as I figured (does it ever?!) But I’m pretty happy with the end result and will now know better for the next time. Because let’s face it, there will be a next time!


Linking up with Bless’er House