This Old Colonial Home

Filling our house with love and a lot of DIY


1 Comment

DIY Nursery Decor

In my last post (see it here) I showed you the finished nursery.Gender neutral nursery room decorNow I want to share with you some of the DIY decor I incorporated.

Let me start with these book shelves.Gray glider gender neutral nurseryAfter perusing Pinterest for some inspiration, I decided to buy two wooden crates, which you can pick up from any craft store.

Using leftover paint from previous projects, I painted the inside of each crate. One a mint green and one a dark blue.Painted inside of wooden crateAfter letting that dry, I then painted the outside white. This turned out to be a pretty tedious task. It took several coats to get the look I wanted. I also didn’t really tape anything off so I did have some bleeding, which I later touched up.White painted wooden crate DIYIf I were to do this again I would either prime it first or just buy the crate in white instead of natural wood to save time.

Since I stink at hanging things, my husband took the lead and used two anchor screws to attach each crate to the wall.

I then filled the now shelves with children’s books and toys. I love how this little nook turned out!Gray nursery reading nookDIY wood crate bookshelves for nursery Nursery glider and book shelf crates Next, I want to share this gallery wall. (I’m such a sucker for gallery walls!)Nursery dresser and gallery wall
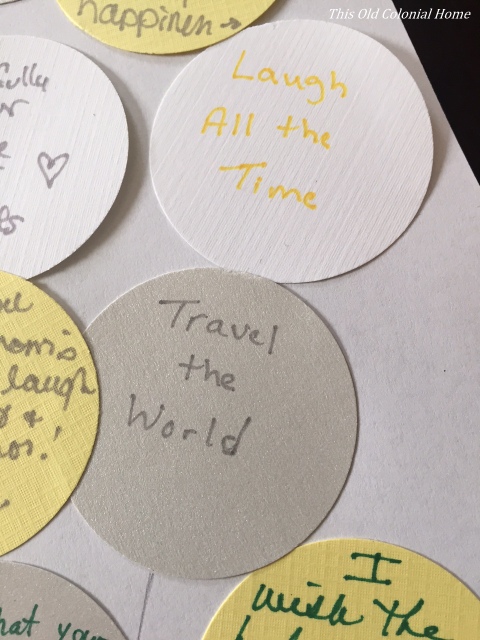
It all started at my shower where we had guests write a wish for the baby on little paper circles.Baby wishes chalkboardLater on I laid out all the circles on a piece of 11×14 paper since I knew that was the frame size I wanted to use. But since that’s not a standard paper size I just cut down a piece of 11×17 paper. The idea was to make the circles look like balloons being held by an elephant, which I simply printed from Google Images.DIY elephant balloon artworkBaby wishes used for nursery decor Once I had the layout I wanted, I glued each circle to the paper and drew lines to look like strings.Glue circles to paper Nursery balloon decor DIY
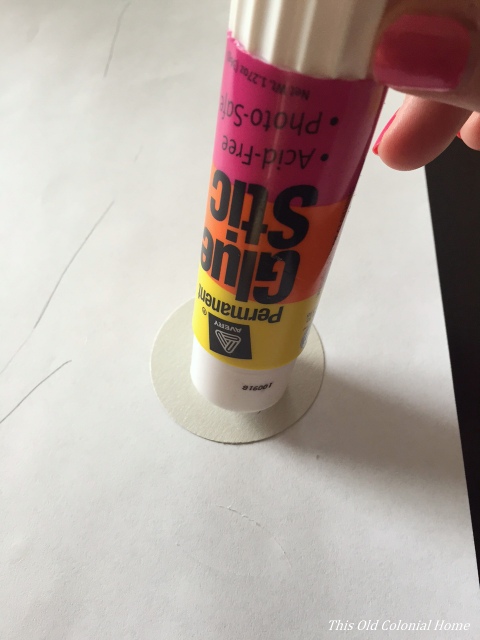
After I found the perfect frame, I used this piece as the center and picked up a few more frames to surround it. Do you know what I used to fill those frames? One is my shower invitation and the rest are simply cut up gift bags!Colorful nursery gallery wall DIY gallery wall for gender neutral nursery Gray nursery gallery wall DIYTalk about a simple, easy and affordable project! But also one that has so much meaning!


6 Comments

A Sweet Makeover

Well I can’t show you the bathroom just yet, but I can show you the nursery! I wasn’t sure I was going to be able to before the baby arrived, but luckily he or she is still cooking … giving us a little more time to get things done (and putting my mind at ease)!

You may recall this is how the room used to look – reserved for guests.Guest BedroomAnd here’s how it looks now – reserved for our little one. 🙂Gender neutral nursery room decor Since we don’t know what we’re having (aside from a baby of course), we went with gender neutral colors of gray, yellow, and white.

My husband took on the task of painting the room since I really shouldn’t be around the fumes. We chose the color Passive from HGTV Home by Sherwin Williams.

I wanted a little something extra in the room, so on one of the walls Jamie added the white stripes. (No, not the band!)Paint stripes in nursery using Frog's Tape White stripes in gray nurseryI love how it turned out! Simple and subtle, but so cute!White crib in gray nurseryNow, let me take you around the room to show you some of the other details.

Here’s a little shelf above the crib that not only holds our video monitor, but also has faux flowers from my baby shower (see more about that here), a cute little giraffe from my friend who threw the shower, and a Beatrix Potter puzzle frame that came directly from the author’s hometown in England!Nursery shelf vignetteThis, of course, is the dresser/changing area. What I love most about it is the colorful gallery wall. But I’ll have more on that in my next post 😉Nursery dresser and gallery wall Did you notice the rug?! We had a few issues purchasing it from Target. It kept going out of stock and then we had some shipping issues, but I’m so glad it ended up working out. It’s so soft and adds such coziness to the room. Those stars are just too cute!Circo gray stars area rug And this corner of the room might just be my favorite spot. I can already envision all the feeding, rocking, and reading to Baby M that will happen here!Gray glider gender neutral nursery I’m so glad this room finally came together. As a mom-to-be, it was important to me to be able to create a space where our little one will grow, have dreams, play, imagine, and make memories!


2 Comments

Fun with Curtains

I’m happy to report that we’re making some progress in the master bedroom! If you follow me on Instagram (@oldcolonialhome) then you know that I recently scored this awesome accent chair at Marshalls.Navy chair with silver nailhead trimI was supposed to be shopping for a mirror at the time, but when I came across this lovely piece with its nailhead trim, I knew I couldn’t pass it up (especially when I had passed up on one similar last summer).

I did eventually find a big, round mirror that I was looking for to fill up the huge wall above my dresser. This rustic, wooden beauty is a HomeGoods find.Round rustic mirror painted woodBut the main thing I want to share with you is our new curtains.Master bedroom curtains I love how they turned out, but man what a process it ended up being!

One of the issues we had was that each of the 3 windows in our room either butts up against the roof line or a wall or both.Window next to roof line Window butted next to wall Window against roof line and wall This makes curtain rod placement tricky, especially since I usually like to go high and wide. That wasn’t going to be an option here. I considered doing roman shades, but I didn’t like the idea of a third of our windows always being covered, blocking natural light.

So I came up with the idea of using one panel on each window and hanging it using a rod made with black steel pipes. But instead of having two ends, we just have one.Industrial steel pipe curtain rodMaking the rod was super easy and cost less than $20 each. Here’s what I used:Pipe parts for curtain rod 3/4″ Floor Flange

3/4″ x 2″ Nipple

3/4″ 90 degree Elbow

3/4″ x 24″ Threaded Pipe

3/4″ Cap

After wiping down the pipes, I assembled the pieces in that order.

Another issue we encountered was the length from the top of the window to the floor. Since the windows are at the roof line, they’re lower than normal. So the standard curtain sizes wouldn’t work — 63″ was too short and 84″ was too long. But you know what’s the perfect length at 72″? Shower curtains! Did you even notice?!Shower curtain for window curtainThey were another HomeGoods happy find, and only cost $14.99 each!

So I had my curtain rod and I had my curtains, but there was one other issue — attaching the two. The pipe obviously wouldn’t fit through the holes in the shower curtain, and most standard shower curtain hooks wouldn’t fit over the pipe, and regular curtain hooks only come 7 to 10 in a pack and shower curtains have 12 slits. Oy! I was getting ready to throw in the towel. But finally I found something and ended up getting these affordable curtain rings from Ikea.Ikea curtain ringsWho knew such a small project would turn into such a big headache? But at least the end result turned out great and that’s all that matters!Curtains in the master bedroomOne panel window curtain Master bedroom window treatmentsWe still have a few things left to do in here (like paint the ’80s ceiling fan, build nightstands, and replace the lamps), but our bedroom is finally starting to feel a lot more cozy!


Leave a comment

New Year, New Projects

So far the new year is off to a slow start in our house. I keep reading about other bloggers’ projects and re-organization tactics. And while inspired (and somewhat jealous), I’m having a hard time getting myself motivated after the holidays. We only just took down all of our Christmas decorations a week and a half ago!

But that doesn’t mean we don’t have some plans lined up.

One of my goals for the new year is to finally finish decorating the master bedroom.Master bedroom nightstandOur furniture is all mix matched, but not in a good way. We don’t have window treatments other than blinds and there’s still nothing hung on the walls yet. It’s time.

So far we have managed to get two new dressers.Master bedroom dresser from Ikea Master bedroom chest of drawers from Ikea I think just about everyone has these Hemnes pieces from Ikea, but they’re so affordable and look great! I think they have definitely helped improve the room.

On the to-do list is replacing the headboard. Even though I like our current one, I think with the new dressers and the wood floors and trim in the room it’s too many different stain colors. I’m hoping to switch it up with a tufted headboard. I think having fabric will help break up all the wood. I love this one!

Martinique headboard

From Amazon

We also hope to eventually make two nightstands. I love our yellow one, but I think we plan to move that into another room. Once we have the nightstands, then I can add new lamps and artwork. I’m also working on styling the long dresser and the big blank wall behind it.

The other major goal for the new year is having our upstairs bathroom completely renovated. We’re talking a gut job!Narrow upstairs bathroom But why you may be asking. Because it’s an incredibly small bathroom that has had (original 1937) plumbing issues, surface mold, and peeling paint in the tub. So we figured let’s start fresh — give it a new layout, take a little space from a bedroom closet and hopefully incorporate a pocket door to give us more elbow room and to make it more functional. This is a job for the professionals. We’ve already got our contractor and will hopefully see work begin in the next few weeks. Think classic subway tile and black and white floors. Something like this perhaps.

Classic black and white bathroom

From Houzz

We are super excited about this! Aside from having our hardwood floors redone and our driveway widened, this is the first major renovation we’re undertaking. I can’t wait to share the progress and end results with all of you!

Here’s to improvements in the new year!


24 Comments

Halloween House Tour

Our house always gets decked out for fall. Halloween not so much. But when Stephanie over at Sandpaper and Glue invited me to take part in a Halloween House Tour, I couldn’t say no. I knew it’d be a fun challenge so I graciously accepted.

Making use of items I already had and picking some things up along the way, I’m pretty happy with how it turned out.

Let’s start in the living room.Halloween mantel with bannerOriginally I was only going to do a banner on the mantel, but when I went to Michaels the other day for ribbon they were having an awesome 50 to 60% off sale. So of course I bought some stuff. (I think I’m addicted to sales! The first step is admitting it.)Orange black and white mantelThe pumpkins, crow, and cage were part of that deep discount, so in my basket they went. I then managed to put this display together at the last minute. I think it adds a nice, subtle Halloween touch.Pumpkins, flowers and candle on mantel Crow and bird cage with gold pumpkinAs for the banner, it was super easy to make. I just cut out flags using leftover scrapbook paper I had and used double-sided tape to attach it to the ribbon. (Yes, I did actually buy ribbon too when I was at Michaels.)  I also made the bats, but there’s more where that came from … as you’ll see in a moment.Banne made with scrapbook paper and ribbonNext, let’s move over to the dining room. I had some fun in here. First, I made a centerpiece using a witch’s hat.Fun DIY Halloween centerpiece I stuffed the hat with grocery bags to keep it from flopping over. Then I just laid a leaf garland around it, added a little black bird, some faux black roses and this adorable spiral pumpkin that I found in the dollar bins at Target. (I wish I could say I made it, but I didn’t. Boo. <— No pun intended!) I also added two gold candles and put a spider on one of them.Halloween centerpiece spiral pumpkinCrow and leaves centerpieceHalloween candles with spider(Source list in case you’re wondering: hat, bird, spider – dollar store; roses, candles – Michaels; garland, candlesticks – already had.)

Second, I put together this fun display.Halloween dining room The wooden chest I had picked up at an estate sale over the summer. I filled it with blankets and then used a leaf tablecloth we had to cover them. I put sticks, pinecones, leaf garland, and a pumpkin on top of that. I then added cobwebs and spiders from the dollar store.Halloween chestPumpkin and spiderwebsAs for those bats – they were really easy to make. I printed a template I found online (I can’t draw to save my life), traced it onto black cardstock and cut them out. I then bent their wings just a little to give them some dimension and so they look like they’re flying.Bats flying out of crate Last, but certainly not least, let’s walk through our back hallway where I dressed up a bookshelf. I had the most Halloween fun with this!Spooky Halloween shelvesI started by lining the back of the bookcase with green wrapping paper. Then I added cobwebs and different pieces that I had collected. Here’s a closer look at each shelf.Happy Halloween Scrabble tilesI love using Scrabble tiles to spell out things for holiday décor. I also love using empty wine bottles. The black and orange label on this one was perfect. You could also use them as candle holders!Pumpkins and boo sign shelf I love the Boo sign. It was a free download here and even prints with that aged look. Another free trick I used was taking a wine glass, filling it with popcorn kernels and inserting a votive candle. Easy, yet festive.Skulls shelf I used another wine bottle with a cool label here. I also used a cake stand for the pumpkin to sit on. And I found a skull and bones template online and traced it onto my DIY chalkboard platter.Harry Potter books as Halloween decorI could have bought fake spell books, but being a Harry Potter nerd fan I knew these books sans dust jacket would be perfect for Halloween. Brilliant!

And there you have it. That’s my Halloween House Tour. Thanks for stopping by! Be sure to swing by the other bloggers’ homes to see their spooktacular décor!

 
sandpaper and glue headshot


Stephanie – Sandpaper and Glue


boxy colonial headshot


Gretchen – Boxy Colonial


designthusiasm headshot


Lory – Designthusiasm


the kim six fix headshot


Kim – The Kim Six Fix


our nerd home headshot


Kat & Cam – Our Nerd Home


Partying with Bless’er House | DIY on the Cheap | The Shabby Nest | Live Laugh Rowe | Living Well Spending Less


4 Comments

Something Wicked This Way Comes

Halloween often gets overlooked in our house. While I am a huge lover of fall (it’s the best time of year in my opinion), I usually focus my décor on leaves, pumpkins and mums, and incorporating oranges, yellows, and reds. You’ve probably already seen some of my fall posts here, here or maybe here.

But this year I’m not going to let All Hallows’ Eve just slip by. I’ve teamed up with some fellow bloggers for a Halloween house tour!halloween house tours - option 2It sounded like fun, and I was up for the challenge of bringing some spookiness to my fall décor. I’ll even show you how I was able to do so without spending a lot!

Here’s a little preview of what I’ve been working on.Halloween centerpieceSpooky Halloween decor Wine bottle Halloween decor Be sure to swing by on Monday, October 20 for the whole reveal. You’ll also want to check out the other bloggers to see their creations. It’s sure to be a (trick or) treat for all!

Stephanie | Sandpaper and Glue

Gretchen | Boxy Colonial

Lory | Designthusiasm

Kim | The Kim Six Fix

Kat & Cam | Our Nerd Home


Leave a comment

Mason Jar Possibilities

Mason jars. We all love them. Some of us might still use them for canning, but many of us have been coming up with creative ways to use them for organization, gifts or decor. For instance, I recently blogged about our DIY Mason Jar Sconce. Hometalk reached out telling me how much they loved it and asked me to curate a board on mason jar projects. I happily obliged!thisoldcolonialhome1409-mason-jar-ideasVases, lighting, and candles tend to be the most popular, but I love how everyone puts their own little spin on it using paint, ribbon, jute rope, etc. I also love the ideas of using just the lids! Traci from Beneath My Heart came up with a fun and easy way to make coasters out of them. And Erin at DIY on the Cheap shows off a cute way to make ornaments.

What I love most is there are options for all 4 seasons! Here are some of my favorites:

1. Fall

Kelly from Live Laugh Rowe simply placed a votive candle in the center of the jar and added vase filler — like popcorn kernels and acorns. These are items you may already have around the house or the backyard! So easy and inexpensive!DIY Fall Decor with Hanging Mason Jars2. Winter

Diana at Anyone Can Decorate made “snow globes” out of her mason jars. She glued bottle brush Christmas trees to the underside of the lids and then filled the jar with fake snow and glitter and turned the jar upside down. I love how she also attached some jars to candle sticks to vary the height. How festive!mason-jar-snow-globes-anyone-can-decorate3. Spring

Tiffany from Offbeat and Inspired came up with this centerpiece that’s perfect for spring! It’s so bright and colorful while also rustic and industrial. She used 6 mason jars along with pipe clips, nuts, bolts, and mending braces to create a snake-like vase display that can be bent any way you like. How unique!mason-jar-vase-centerpiece-offbeat-and-inspired4. Summer

Dee over at Meatloaf and Melodrama guest posted on PinkWhen her bright, fresh, and fruity mason jar utensil holder. All it took was a little spray paint and ribbon. And she simply used a black sharpie for the watermelon seeds. So cute and perfect for a backyard barbeque!summer-mason-jars-pink-when As you can see, the door of possibilities isn’t just ajar (see what I did there?!) … it’s wide open! Head over to my Hometalk board to see the rest of these fantastic ideas.

What mason jar projects have you made?


6 Comments

Final Piece

You’d think with it being summertime I’d have plenty of finished projects to share with you. But that’s not quite the case. My husband and I have been spending our free time traveling and doing summery things (i.e. barbeques and relaxing) and not too much around the house.

But just so you don’t think we’re completely lazy, there is one minor thing worth noting. I FINALLY picked out curtains for the living room — which makes the room done!! It’s something that I’ve had in the back of my mind since at least March. That’s when I bought curtains from Home Goods that I thought I liked, but really only liked the price (2 panels for $16.99). I only just returned them this past weekend. Oy!

I had also picked up curtains from Lowe’s that later got returned. And then I bought 2 other curtains from Lowe’s in the same pattern but different colors. I even took a survey on Instagram (@oldcolonialhome) to get some opinions. Why is this such a tough decision?! curtainsOf the 2 I chose these! And I love them! I thought I would want blue to pick up the other accents in the room, but the brown/green ones ended up looking better in person. DSC_0462The best part about being indecisive? The price came down! All 4 panels cost less than $60 total after tax!! I’m so happy this is done. It was the very last piece to the puzzle. The living room is completely finished! Check mark! DSC_0446DSC_0453DSC_0450And in case you missed it, our living room is also “award-winning.” 😛  I entered a contest on Pinterest — #PinItToWinIt by HouseHunt.com. All you had to do was post before and after home improvement pictures to become entered to win a $50 gift card to Home Depot, and they ended up choosing my entry! Fun! You can check out their article here.

Jamie and I hope to accomplish a few more projects this summer … unless the dog days get to us first! What about you — do you plan on using the warmer months to get stuff done or to slow down a little?


4 Comments

DIY Coffee Table

Aside from finding the plans, I certainly can’t take any credit for our awesome, new coffee table.

It all started when I saw this lovely post on Pinterest/Hometalk, which then led me to the incredible site ana-white.com.

Rustic wood coffee table using Ana White plans

Courtesy Creative Little Daisy via Hometalk

If you’re not already following her – START! Her pieces are gorgeous and she provides free, easy-to-follow plans to make your own furniture — saving you some cash.

Jamie picked up the necessary materials, any tools we didn’t already have, and even got a table saw from his dad. (Thanks, Jim!)Supply of pine and douglas fir boards for coffee table Making cuts for the coffee tableWhile I was working on my dresser makeover, Jamie began working on this project. He followed the cut list and then began assembling the pieces step-by-step.The cut list of boards ready for assemblying Screwing the coffee table frame togetherCoffee table base assembledThis is what it looked like when he was done. Pretty impressive for a novice, right?!Base and top of coffee table togetherDIY coffee table assembledHe did have one slight hiccup that needed to be fixed. When we brought it inside to test if it was level – it wasn’t. After taking the top off and apart, he determined that the base was level, but some of the boards on top were warped causing it to be thrown off balance. Jamie eventually replaced the boards with new ones and – voila! All better!

After that, he filled any major holes with wood filler and gave it a good sanding. He then applied a wood conditioner before moving on to the stain. (We picked Minwax Special Walnut.) He brushed on the stain, let it sit for a few minutes and then wiped it off with a rag.Applying pre-stain before stainingA can of Minwax stain Special WalnutApplying the first coat of stainIt took 3 coats to get the look we were going for.Coffee table completely stained with 3 coatsI just LOVE how it turned out! Who knew my husband was so handy?! (I think I’ll keep him around!) Here it is in our living room, where I think it fits in perfectly!DIY coffee table in living room DIY wood coffee table and gallery wall in living room  Close-up of wood coffee tableDIY coffee table and decor Side view of coffee table with XRustic coffee table with blue and green accentsFront view of DIY coffee table Rustic living room with handmade coffee table In the end, this project cost only about $100! Try finding that in a furniture store!


Leave a comment

Home for the Holidays

Did any of you score some post-Christmas deals?! I usually avoid the stores after the holidays, but while visiting my parents I happened to see an ad in the paper for Hobby Lobby – 66% off all their holiday decorations! This was an opportunity I knew I couldn’t miss, especially since we don’t have a Hobby Lobby near us in Jersey. My mom was gracious enough to join me, and boy did she help me snag some good deals!

I knew I needed a wreath for our front door. I had picked out a typical green pine one, but she talked me into this one, and I’m so glad she did!

IMG_1552

It’s so unique! The best part – it was originally $70, I got it for $23! Here it is on our front door. I don’t think the picture quite does it justice.

photo 4

Since we have a colonial house, some year I wanted to get wreaths to hang on all of our front windows. Well, next year I’ll be able to! I also scooped up 5 wreaths, bows and ribbon for a total of less than $25!

IMG_1551

I’d also like to take this opportunity to thank our family for all of their generosity this Christmas. Your thoughtful gifts are truly helping make our house a home. We are so blessed! Here’s just a small sampling (pillows were popular, which is great because they add such warmth!)

It's A Wonderful Life pillow from my husband

It’s A Wonderful Life pillow

Awesome handmade canvas throw pillows inspired by Etsy

Handmade canvas throw pillows inspired by Etsy, as well as a new velvet blue throw pillow

I Love You shams and new yellow throw pillow

I Love You shams and a new yellow throw pillow

We also received several gift cards, which will come in handy as I start to decorate more (look for a gallery wall coming soon hopefully). And we received new light fixtures for our entryway. Check back for that post shortly.

And of course, Christmas wasn’t just about the deals and gifts – it was a chance to celebrate our faith, spend time with our family and friends, and to slow down just for a little while. We hope you were able to do the same!